

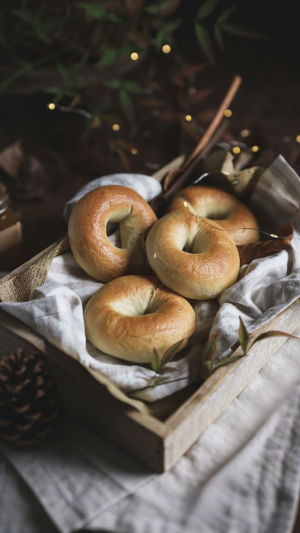
Hey Lykkers! Have you ever tried making your own bagels? If not, now’s the time. Fresh, chewy, and golden-brown — making bagels at home is so much fun and way easier than you think. Plus, the smell of fresh bagels baking in your kitchen?
It’s basically heaven in the form of a scent. So let’s get to it, and I promise you, these bagels will be your new obsession.
<h3>What You’ll Need: The Essentials</h3>
No fancy ingredients here — just the basics that you probably already have at home. Here’s your list to make those bagels of your dreams:
- 3½ cups all-purpose flour
- 1 tablespoon sugar
- 2 teaspoons salt
- 1 packet active dry yeast (about 2¼ teaspoons)
- 1½ cups warm water (110°F — like a warm hug for the yeast)
- 1 tablespoon vegetable oil
- 1 tablespoon honey (yes, honey is your secret ingredient for that perfect chewy texture)
- Toppings: sesame seeds or even a little sea salt — your bagel, your rules!
<h3>Step 1: Wake Up Your Yeast (It’s Time to Get the Party Started)</h3>
Alright, Lykkers, first things first — we’ve got to wake up the yeast. In a small bowl, mix together the warm water and sugar until the sugar’s all dissolved. Sprinkle the yeast on top and let it sit for 5-10 minutes. You’ll know it’s working when it gets all bubbly and frothy, like it’s ready to party. Once it looks like that, it’s go-time!
<h3>Step 2: Mix the Dough Like a Pro</h3>
Now, let’s get this dough going! In a large mixing bowl, combine your flour and salt. Pour in that activated yeast mixture and your vegetable oil, then mix it up. You’ll start seeing dough form — but don’t stop just yet! Turn that dough out onto a floured surface and knead for about 8-10 minutes. This is the fun part — let the dough come to life under your hands. It’s gonna go from sticky and lumpy to smooth and elastic, and that’s when you know it’s ready.
<h3>Step 3: Let It Rise (Time for Some Dough TLC)</h3>
Once your dough is all smooth and stretchy, it’s time for a little rest. Lightly oil a bowl, pop the dough inside, and cover it with a damp towel. Now, let it rise for about an hour, or until it doubles in size. You can catch up on your favorite show, dance around the kitchen, or even take a quick nap — just make sure to check back when the dough is nice and fluffy.
<h3>Step 4: Shape Those Bagels (You’re a Bagel Artist Now)</h3>
Okay, this is where the magic happens. Punch the dough down gently (release all that built-up air!) and divide it into 8 even pieces. Roll each piece into a ball, and then poke a hole in the middle with your finger. Gently stretch that hole until you have a beautiful bagel shape. Don’t stress if they’re not perfect — they’re handmade! That’s part of their charm.
<h3>Step 5: Boil the Bagels (Here’s the Secret)</h3>
Here’s the step that makes all the difference — boiling the bagels. Bring a large pan of water to a boil and add that tablespoon of honey. This is the trick that gives bagels their signature chewy texture and shiny, golden crust. Drop the bagels in, two at a time, and let them boil for 1-2 minutes on each side. It’s like a spa treatment for your bagels, so enjoy it. Once they’re done, remove them with a slotted spoon and set them on a baking sheet.
<h3>Step 6: Top ‘Em with All the Good Stuff</h3>
Now it’s time to get creative! Here’s where you can go wild. Top your bagels with sesame seeds or any other fun flavor combo you love. You could even sprinkle a little garlic or sea salt for that extra kick. Your bagel, your rules!
<h3>Step 7: Bake ‘Em to Perfection</h3>
Preheat your oven to 425°F (220°C). Pop those bagels in the oven and bake for about 20-25 minutes, or until they’re golden brown and crispy. As they bake, your kitchen will start smelling like a bagel shop, and you’ll feel like a pro. Keep an eye on them, though — you want them nice and golden!
<h3>Step 8: Slice, Top, and Enjoy</h3>
When your bagels are done, let them cool for a few minutes. Then, slice them open, add your favorite toppings (cream cheese, jam, or even a bit of butter), and take a bite of your fresh, chewy masterpiece. Honestly, there's nothing like a homemade bagel.
<h3>Pro Tips for Bagel Brilliance</h3>
<b>- For Extra Chewiness:</b> After shaping your bagels, let them rest for about 10 minutes before boiling them. This gives them that extra chewy texture we all love.
<b>- Get Creative:</b> Want a twist on the classic bagel? Add herbs, cheese, or even sun-dried tomatoes to the dough itself for a fun, flavorful twist.
<b>- Bagel Storage:</b> They’re best fresh, but if you have leftovers, freeze them! You’ll have fresh bagels whenever you need a bagel fix.
<h3>Congratulations, Lykkers! You’ve Made Bagels!</h3>
And there you have it — your very own batch of delicious homemade bagels! Whether you enjoy them for breakfast, lunch, or a late-night snack, these bagels are going to be your new go-to recipe. So next time you’re craving something fresh, skip the store and head to your kitchen. You got this, Lykkers! Happy bagel-making!


